Please Read!!

Hey everyone if you find something you like but the link does not work then please go to my website at http://www.wandascrafts.com. The majority of my files are over there. I am working on fixing all of the links on my blog but it takes time. Thank you.
Showing posts with label Swaps. Show all posts

Saturday

ATC witth Hearts

Here is a 21/2 by 31/2 ATC that I made for a swap using my file below. I used copper embossing powder on the frame to give it an antique look.

Thursday

Heart Swirl Tag

I made this tag for a swap using my files below and embossing powder. Every piece has been embossed with embossing powder. If you have questions please don't hesitate to email me or if you leave a comment with a question please leave me your email address so that I can respond ....................ENJOY!!


Wednesday

Valentine Hanglie Danglie Art Swap

I made this for a swap for one of the groups I am in. This is called a Valentine Hanglie Danglie and is going to an online friend of mine named Angie. I love doing these kinds of swaps because it allows me to be creative. The arrow is from one of my svg files below. Thanks for looking!! Enjoy!


Monday

Snowman Tag and Snowflake ATC Swap

Here are a couple of projects I did for some swaps. The snowman tag SVG file is below this post. ENJOY!!


Sunday

Christmas Brown Bag Book for Swap

Here is the Brown Bag Book that I have been working on all night. I made another one but didn't like it so last night I had a brain storm and this is what I came up with. I sure wish these brain storms would come during the day and not at night. I was up all night working on this...lol... Each page has a folding technique frame for a picture and then the opposite side is for journaling. I do hope the recipient likes it!!

The word Christmas and 2009 SVG that I used is below this post... ENJOY!!


Thursday

Just a couple of swaps

Here is 2 swaps I worked on this week. The first one is a candy bar wrapper that I tried to keep simple and use a pretty paper and some pretty ribbon. I just didn't want to over due it.


This second one I found some bags that were decorated with Santa and I cut the bags out into the stocking shape then used my hole punch and twine to sew it together. I left the handle on from the original bag so that it can be hung. I just love the vintage look of it.


Tuesday

Ace of Diamonds with Folding Technique

This Ace of Diamond was made for a swap. It is 2 1/2 by 3 1/2. I made the diamond seperate from the card and for the letter "A" I used my Cricut by replacing my blade with a miniture Sharpie marker......ENJOY!!
CLICK HERE to get this file in my Volume 1 set of svg files...ENJOY!!

ATC with Folding Technique

This ATC was made for a swap. The theme of the swap was "A pumpkin with a child in mine". This ATC is only 21/2 by 31/2 so the cuts where very delicate and a bit challenging to fold but I love the end result.

CLICK HERE to get this file in my Volume 1 set of svg files...ENJOY!!

Tag with Folding Technique

I designed and made this tag for a swap using the folding technique. You can find these cuts on Penny's blog if you wish to make your own designs with them. I think I have found something that I really enjoy doing. You will see more of this type of designs in the future. To learn how I make these read my post below called "Thanksgiving Card"........ENJOY!!!


CLICK HERE to get this file in my Volume 1 set of svg files...ENJOY!!

Sunday

Thanksgiving Card and SVG file

This card was made for a swap I am in. To make this card I once again used Penny's cut file for the edges and then I used store bought embellishments to complete my card.

How I made this card. This card is 3 layers. I glued 2 pieces of paper back to back with spray adhesive. (note: you can skip this step if you have double sided paper.) Then I cut them on my Cricut. After I cut them I flipped the large triangle backward and then folded the large triangle under the small triange. When you do that the back side get flipped up and you can then see the design from that side. After I was done I turned my card over face down and sprayed the backside with spray adhesive and then layed a 3rd sheet of paper face down on the back side of the card giving the front of the card a background color inbetween the triangles.
NOTE: When using spray adhesive hold your paper in a large trash can or bucket so the spray will not get all over everything. Also you can use a clothes pen to hold the paper on the very edge instead of holding it with your fingers so you won't get the glue on you.


CLICK HERE to get this file in my Volume 1 set of svg files...ENJOY!!

If you want just the cuts you will need to go to Penny's website....ENJOY!!
Church

This church was made using one of my files a couple posts down. I made this church so that it can sit in a window sill and the windows and doors of the church light up giving it the stained glass affect. ...ENJOY!!

Wednesday

Feet

This is a card for a swap. The card had to have something to do with feet and this is what I came up with. My Cricut cut the words and the feet and I used pink paper for the background. Then I embellished it with funky disks and yarn that I braided. I wanted it to have a wild 60's/70's feel. Let me know what you think... Enjoy!!


CLICK HERE to get this file in my Volume 2 set of svg files...ENJOY!!

CLICK HERE to get this file in my Volume 1 set of svg files...ENJOY!!

Sunday

Tea Time Image Swap

Another card for an Image swap. The image of the Tea Time was to be used on a card. The table and chairs are a free svg that I shared a while back but I will share again here.

Please let me know if you like what you see....Enjoy!!

CLICK HERE to get this file in my Volume 1 set of svg files...ENJOY!!


Another Floral Card and Free SVG File

I created 2 cards with the same floral cut that are different sizes to see how it would cut at a small size and a larger size and they cut perfect. I cut them on embossed wallpaper then used colored paper as the background. My Cricut setting for this paper was: Blade 4, Max Speed, Max Pressure.
How I put it together:
After cutting take your time weaving and then removing from the mat to keep it from tearing. Then I sprayed the back with a spray adhesive, I do this holding my card inside an old bucket to keep the adhesive from getting all over everything. I then lay it on my backing paper which is larger than my card so that I have room for error. Take your time and hold up the floral part until you are sure that it will lay right. Then press firmly and cut off the excess edges of the background paper. Then using the perforations on the card, fold. Add embellishments and your done. Enjoy!!


CLICK HERE to get this file in my Volume 2 set of svg files...ENJOY!!


Saturday

Floral Card and SVG File

Here is a card I did for yet another swap. I used a floral file from http://kldezign.blogspot.com/ to create my card in Inkscape. I had to make some changes to the floral cut in order for it to cut properly. I used Vellum behind the cut for the soft white look, the word Joy is a sticker and instead of making a bow I twisted my ribbon. Enjoy!!


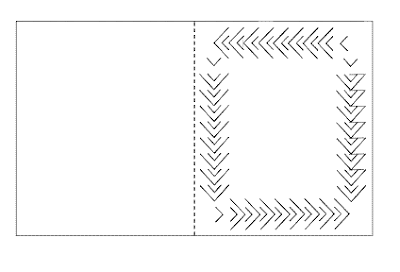
Here is what the SVG file looks like. I put a perforation line down the middle to make it easier to fold. This cut is very delicate and takes time to weave.

CLICK HERE to get this file in my Volume 2 set of svg files...ENJOY!!

Monday

ATC Swap - Lady

This is another 2 1/2 by 3 1/2 ATC (artist trading card) that I did for a swap. The theme was called Lady.

Altered Joker Card

Here is the front and back of an altered Joker card for a swap I am doing called Altered Deck of Cards.


Saturday

Journal for my Daughter's BDay

My daughter just turned 25 today or as she says, a quarter of a centry old....Gosh what does that make me? Anyhow I made her this journal and a card that I posted a while back but I am showing again in this post. I also bought her a few other items. She was thrilled and had a great Bday today.
Here is the journal I made.
Here is the card I made for her.

Monday

Fall Card for Swap

Here is my first Fall Card. I made a matching envelope to go with it.

The leaves on this card are stickers.

The leaf on the envi was created using a cuttlebug die cut.

If you want to learn how to make envelopes then go to Penny's blog. She has wonderful tutorials.

Friday

I'm Back

I have been away for a while but I am back and trying to get into the swing of things again. This summer has been very long and very busy. We went on a 2 week vacation then a couple days after getting home our grandson flew in and stayed with us for 5 weeks. In the mean time our youngest son also flew in and is still here taking a break from college. I have really been enjoying myself but have not had time for my art or keeping up with my blog.

Here are some cards that I did for a swap. Hope you like them.

On this card I used free rub on paint samples from Tatouage Designs. You can go to http://www.tatouagedesigns.com/ to request a free sample.

The flower I made using one of Penny's designs on her blog at http://pennyduncancreations.blogspot.com/. While you are there you might want to check out some of her awesome new tutorials on how she creates her SVG files plus more.

Powered by WebRing.